Our home server/HTPC broke down after close to 6 years, and it was time to replace it. Being me, I didn’t want to just buy an off-the shelf machine – where’s the charm in that?
This one is a little different than my previous builds. I didn’t modify an existing enclosures this time, but instead created one completely from scratch. 3D modeled and 3D printed based on nothing more than my own ideas and my own measurements.
I do like reusing and repurposing existing things, and I try to not get stuck in a throw-away mentality. This new case is however entirely made from renewable or recycled materials. The main body is printed using biodegradable PLA plastic (made from corn starch or cane sugar). The only other parts of the case consist of a power switch and an LED, both taken from the failing computer it was meant to replace.
I had an idea of a completely smooth case without any visible corners, with a single air inlet on the top connected to the CPU fan. A number of smaller air outlets near the bottom would force the airflow to spread out around the motherboard and the rest of the components. The shape would initially resemble a simplified cloud, but that quickly changed.
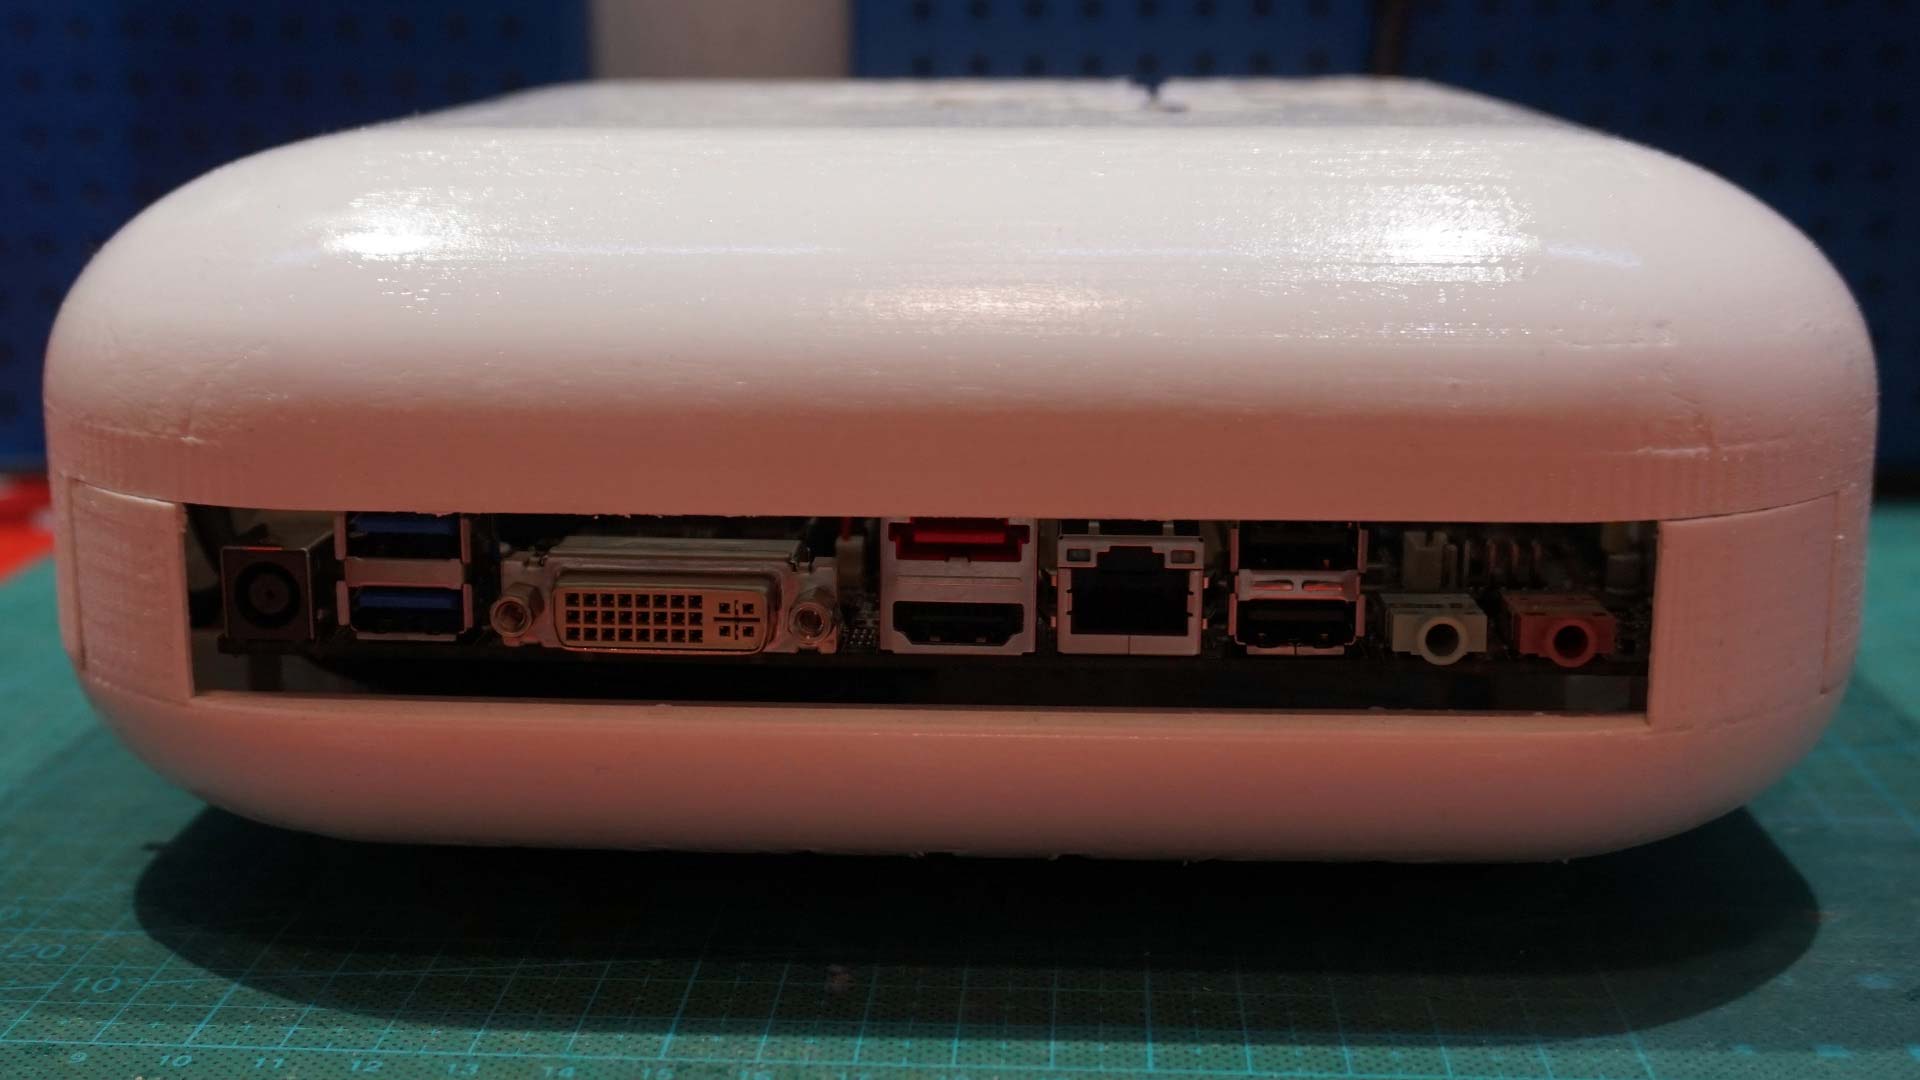
I was impressed with the layout, performance and tweakability of the Asus H81T Mini-ITX motherboard that I used for the 1-Up NES case mod, and decided to use another one for the new case. Most important was the fact that the H81 has a rear power jack that fits standard laptop power bricks, and I could pick up a used one from Dell on eBay that worked right away, no modifications needed.
I used a modeling tool that I already knew; Tinkercad – a free, browser-based online CAD tool from AutoDesk. It has limited functionality and performance, and I’m planning on learning a “real” CAD program soon (Fusion 360?), but I was eager to get started right away. After a number of versions and revisions, I had a rough printed version (5) up and running 24/7 for about a month. After a lot of checks, changes and tweaks, I finally printed the final version (8) on my heavily modified RigidBot 3D printer. By now the initial project name Fluffy had changed to Frosty, and the design would now look more like snow than a cloud. I made a snowflake design for the air inlet, which also serves as a fan guard.
After sanding I applied a few layers of acrylic clear coating to get more of a snow crust look. PLA is notoriously hard to sand as it melts and clumps up if you go too fast due to the friction. I only went up to 240 grit, which is why the surface isn’t perfect. If this was a job for someone else I would go to at least 800 grit, but as it will only be used at home this is good enough.
Bottom and top parts after sanding and clear coatingInsides before assembly
When assembling the computer, pretty much everything fit perfectly. I only had to drill the hole for the LED a tiny bin larger and use a scalpel to shave off about 0.2mm for the power switch.
Unless you have your ear right next to the computer, you can’t hear it running. Since I use an SSD, the only moving part in the computer is the CPU fan, and Intel did a fantastic job with making it whisper quiet – at least when enabling the Q-Fan control in the UEFI bios.
With the CPU on full load on all cores at 3.2Ghz, the computer is still almost dead silent and the CPU temperature is usually around 30°C.
All in all, I’m happy with the results. I’ve learned a lot and had fun doing so.
Outline of case functionalityPower LED insertedPower switch insertedEmpty case, seen from rearFully assembled case, seen from rearEverything in place except top coverEverything in place including top coverAt it’s current home, next to external HDD. Previous computer occupied entire shelf, hence the extra space.
The packages arrived today!
In the image below you can see the components around the chest where I plan to stuff it all soon. In the background is a full size travel chest, so you can see the size difference. This will be my own personal little treasure chest. 😉
Last week I ordered a bunch of components for building a new computer. The main reason is that I want to be able to use triple screens with Eyefinity, and my current setup can’t handle that. I’ve been using dual monitors for about 7 years and never looked back, but I would like some more screen estate, especially when working in Photoshop and the likes, and playing 3D games. Games like Dragon Age (I/II) etc works fine with dual screens, but I find it annoying that all texts etc are split in the middle between two screens. For better vertical resolution, I will use my three 21″ Dell screens with IPS panels with extreme viewing angles and a lot better color depth than “normal” computer screens. And they can pivot, meaning I can place them vertically. The full resolution will be 3150×1680 with an aspect ratio of 15:8, slightly wider than standard 16:9 widescreen. And since my current computer is 5 years old, I thought it was about time to buy a new rig anyway.
The thing I enjoy most about getting a new computer is to build the case. To be able to fit the 3-slot wide, passively cooled graphics card alongside the CPU cooler, I could not go with a 17x17cm Mini-ITX motheboard this time as I have for my last two builds, but had to step up a level to a 24x24cm Micro-ATX instead. The size for the components are perfect for a case that I will build out of a small wooden chest. I will try to make the chest to look as close to the original as possible, not revealing that it actually contains a computer until you get a closer look at the sides and the rear.
Since everything but the CPU is passively cooled, even the PSU, the case will require some airflow as to not overheat. I will go for a silent 12cm fan on each side with adjustable speed that you can turn up if needed while playing heavy games or during a hot summer (Or I can just open the chest lid). The big problem will be to have air vents in the chest without it looking too strange. Right now I’m in the decision process on whether I will cut a 12x12cm hole on each side and place a fan grill above them, or if I will simply cut a lot of smaller holes in the chest around where the fan will be placed on the inside.
Two days ago I downloaded Google SketchUp, a free 3D modeling program, to do a design draft and make sure all components will fit. It was quite easy to learn, and after about a total of 8 hours learning and designing, I’ve come up with this. All done from scratch:
The lid in the model is semi transparent in order to actually see the parts inside the chest. Everything is made with millimeter precision, and I’ve used my slide caliper plenty to measure everything correctly. To be less then modest, I’m quite impressed with the progress I’ve made in this short time. I do have previous 3D modeling experience, but that was back in 1995-96 in Autodesk 3D Studio for DOS. I can tell you this: SketchUp is a lot easier to learn.
The computer components are all top notch, and it’s hard to get better components than these without a major step up in price:
Have you ever thought about how the meeting of two people affects the world around them?
Consider a man and a woman in their thirties who know nothing about each other, walking in opposite directions towards one another in the middle of the city. Let’s call them Derek and Susan. Suddenly Derek trips on a crack in the pavement, and falls over just in front of Susan. She stops to help him up, they smile, and after an awkward moment of silence she asks him out for a cup of coffee. Ten minutes later they sit in a café, she’s having a latte and he’s having espresso. When they leave, Derek asks for her phone number. She jots it down on a note, and gives him a peck on the cheek. He says he will call her, but he never does.
So how has this short meeting affected the surroundings?
First off, the stumbling in the street:
Unaware to Susan, Jake, a pickpocket were just about to snatch her wallet from her unintentionally open purse when she suddenly stops to help Derek up. When bending down, Susan’s purse slides down her shoulder and out of reach for Jake, who has to leave empty-handed. A blessing in disguise for the tired pickpocket, who otherwise would get caught using Susan’s credit card, starting a downward spiral that would ultimately lead to his demise.
Second, on the way to the café:
Short on cash, Susan stops by a cash dispenser. Derek offers to pay for her coffee, but she declines with a wry smile. Jonathan, a young film student next in line gets inspired by this scene, writes a blockbuster and dies four years later from an overdose of heroin, blinded by his own success.
Third, at the café door:
At the door they bump in to Betty, an old classmate of Susan. Betty is in a hurry, but since they haven’t seen each other in fifteen years, they chat for about two minutes before she rushes off. That is enough for her to miss her bus, having to wait for another 20 minutes. At the bus stop she meets Kevin, another classmate from the same class as Betty. They sit next to each other on the bus, laughing and remembering the old times. At his stop he asks her to come by his place. Having forgotten why she was in a hurry in the first place, she blushingly says that she’d like that. A year later, they have a baby girl named Fiona.
Fourth, at the café:
Jenny, an exchange student from who works part-time at the café, takes their order. When preparing Derek’s espresso, she accidentally puts her hand on a hot part of the espresso maker, scalding two of her fingers. Studying music and playing the violin, she won’t be able to perform on the next school concert. If she would have played at the concert, a talent scout would have discovered her, and she would release two mediocre albums in her music career. Instead, she works full-time at the café after graduating.
Fifth, when leaving the café:
Outside the café sits Elton, a homeless man. He asks the couple for change. Thinking he will only use it for drugs or booze, both Derek and Susan ignore him. Elton freezes to death the very same night, not being able to afford shelter.
Sixth, when Derek gets home:
When Derek gets home, his wife Kate is already there. She usually gets home about two hours later than Derek, and is used to having Derek meet her at the doorstep every day. She is just about to ask him where he has been when she sees the slight lipstick mark on his cheek. Instead of asking him about it, she doesn’t say a word the rest of the evening. Later that night when Derek has fallen asleep, she cuts off his penis with a kitchen knife, Lorena Bobbitt-style. In the aftermath, she doesn’t believe Derek when saying him and Susan only had a coffee, so she tells him she wants a divorce, moves to another town and lives a miserable life. The doctor’s not being able to re-attach his penis, so does Derek.
Seventh, at Susan’s place:
A week after they’ve met, Derek still hasn’t called Susan. This is of course because Derek is in the hospital with a chopped off penis. But Susan doesn’t know that, and simply thinks that he has ditched her. This frustrates her, and she unconsciously takes it out on her work as a business negotiator for a software company. This proves however to be a successful method, and she takes the company to new heights using her anger at men in general as a mental negotiation method. She writes a book about it, gets rich from it, and lives out the rest of her days with a mute Japanese named Takeshi. “If they can’t speak, they can’t lie”, she humorously says to her friends.
So what can we learn from this short story about two people having coffee together? That everything we do affect other people. It sets in effect events too small for us to notice, but events start other events which in the end might change the world as we see it.
That’s something to think about the next time you have a cup of coffee with someone.
———-
The above was written as part of a school project I did some years ago. Discussing chaos theory with M yesterday, I came to think of it and thought I should post it.
Merry Christmas, Happy New Year and all that. Hope the holidays have treated you well.
Personally, I’ve been spending to much time in front of the computer and the screen and have decided to take a break.
Starting to day, I will not sit in front of the computer, watch any movies or playing any video games (including RISK on my cell phone) while at home. Right now I’m at work where I have to use the computer, so I justify some minor blogging and facebooking from there with that.
I will try to catch up on my reading and possibly some project that has been laying around (Got a brand new wireless Dremel for Christmas!), but the main reason is to simply disconnect for a while.
Let’s see how long it takes before I forget myself – I hope I can last a week anyway. 😉
Update:
I lasted the whole week and finished reading two books. Although on Sunday evening I watched a movie because I was utterly bored. 😉
Tomorrow I will possibly have the worst trip of my life so far. Or the most boring, back-aching, cold and lonely. Or the best.
Anyway, I will attempt to drive my Gilera Runner (50cc) från Stockholm to Ulricehamn, a trip that totals about 440 kilometers. I will make a stop (and possibly spend the night) in Tibro, but have otherwise no plans besides hourly stops to stretch, eat, and so on.
Why? The practical reason is that I’m going to store the moped at my parents place during the winter, but the other reason is probably just for the heck of it. “Because it’s there”, as a mountain climber would say. When I was 15 I wanted to go on a moped vacation with my friends, but that never happened so perhaps I’m subconsciously compensating for it now. 😉
To quote the great Waylon Jennings: I’ve always been crazy but it’s kept me from going insane.
Actually, it was done about two weeks ago, I just hadn’t taken the time to give you the update.
It is now working fine, but I might replace the PSU with a full-sized ATX one due to unacceptable noise levels in the current FSP AC-DC 200W SFX12V PSU. Hiper HPU-4S425 looks promising. The problem is that a full sized ATX won’t fit in the case if located where the current PSU is. I am thinking about placing it above the drive cage which would also giving it better airflow and hopefully lower RPM. The problem is that I would have to build a second floor in the cage, and I’m uncertain how it would affect airflow and temperatures for the drives and motherboard (already actively cooled).
We’ll see.
Wanna see? Have a look:
I temporary placed everything in the first wooden case while waiting for the bakelite version to arrive.
The radio as it were before stripping it.
I started by removing the back.
With the help of my friends Mr. Screwdriver and Mr. Wire Cutter, the innards were soon cleaned out.
The actual radio receiver taken out.
Removing the cover plate. I used a towel underneeth as to not scratch the front.
Due to an extremely tight fit of the motherboard, I had to cut the lower part of the cover.
Some hot glue allowed me to use an original switch as a power button.
Screwing the power switch in place.
Testing that everything really fits. It’s tight, but it works.
From the front with the lower part of the cover gone.
Using a plastic clad wire as the station needle.
Some soldering were required for the LEDs lightening the glass.
Lightening in place. Green cardboard are now in place as glass cover.
Lights can be turned on with a simple switch and is powered by a regular 12V molex connector.
I used an oak board as base for the components. Plexiglass was used as a motherboard base plate.
Attaching the oak board from the bottom.
Plexiglass is also used to attach the PSU, along with double-coated adhesive tape to also prevent vibrations.
Everything in place, including a HDD LED placed right behing the Philips logo.
The wires fit tightly. Unfortunately, there was not enough molex connectors to power the lights as well. Will buy a cable splitter or new PSU.
To the left of the PSU is a dual USB outlet (gray cables) used to power the external DVD drive.
Computer in place and running. Using a flash and from a low angle you can clearly see the DVD drive on top…
But under normal circumstances you don’t notice the DVD drive.
After scrapping the Typewriter Project, I’ve been searching for a new case to house my new HTPC/NAS/Web server. I first bought a 50’s Centrum radio at the Tradera auction site. Unfortunately, when I got it the glass front was cracked and beyond salvation due to either bad packaging or bad handling by the delivery firm (or both).
I decided to replace it with plexiglass in front of a custom background printed on photo paper.
After having gutted the radio, cut and filed the plexiglass, measuring everything to a precise fit and ordering the parts, I browsed in to Tradera again. And almost fell in love. By that time there was 2 hours left with only one bidder for the auction of a Bakelite-cast Philips radio with room enough to fit everything I need for it. I won the auction paid 315 SEK for it, plus shipping.
Now I have received all parts for the computer except the radio itself and a slot-in DVD-drive that I ordered from eBay.
If you are not interested in technical mumbo jumbo, you can stop reading now.
AMD ATHLON 64 X2 5050E which I got almost 300SEK cheaper due to an error on the distributor’s part. I talked with the seller and he told me I would get the lower price anyway since I had already paid for it when the error was discovered.
2 x Western Digital 1TB Caviar GP (I already have 2 x 500GB drives which I will add at a later time)
Kingston HyperX DDR2 2GB 800MHz CL5. Only one memory slot on the board, and it doesn’t seem to support more than 2GB-
LIAN-LI EX-34 drive cage/cooler. Since I am going to use a total of 4 HDD’s in a custom case, it is way easier to use a pre-built drive cage than build your own.
FSP AC-DC 200W SFX12V PSU. Since both the PSU, motherboard and the drives all have very low power consumption, this should be more than enough. Plus, it’s way smaller than a normal ATX-PSU which wouldn’t fit in the radio.
Slimline slot-in USB-powered CDRW/DVD drive.
The Problems
First I tried to install Windows XP (Professional N Edition). Since I am using the drives in a RAID-1 configuration, I pressed F6 when asked to provide the needed drivers.
If you didn’t already know, SCSI and RAID configurations in XP requires that you before installing insert a floppy with the needed drivers. The problem is that the motherboard (where the RAID controller is located) doesn’t have a floppy connector. To get around that, I prepared a USB stick using HP Drive Key Boot Utility, making the USB stick appear like a floppy (and only holding 1.44MB). Unfortunately, XP’s installation procedure refused to recognize the USB stick as a floppy and would not read the drivers from it. This ment there was no way for XP to find the drives where the installation should take place.
I then decided to slipstream the drivers onto a custom installation CD using nLite. This worked fine and the installation went fine. However, upon starting windows for the very first time, I got a short bluescreen followed by a reboot. This happened again and again and Windows simply wouldn’t start. What I didn’t know at the time was that since the RAID drivers wasn’t signed, Windows diecided to replace them with it’s own default drivers during the final stages of installation. These did of course not work with the RAID controller, resulting in the repeating crash.
After much frustration I decided to give up and try Windows 7 RC, which had been released some day before. I had used the WIndows 7 public beta on my Eee 1000H previously, but switched back to Xp after about a month. I convinced myself that the RC would be better and I would feel more comfortable with it. So after some hunting down, I found a good ISO, burned it and installed Windows 7 on the machine. No hassle with drivers were needed, Windows found the RAID array all by itself. However, some time after installing Windows I started to get messages about the RAID array dropping out. Removing and rebuilding the array helped for a while, but the error returned. By this time (around a full day) I was also getting sick of Window 7’s I-will-not-let-you-decide-anything-on-your-own-because-humans-can’t-be-trusted attitude. Since this will be both a web server and a NAS, I want full control of it. Most of all, I want to feel that I am in full control of it. So buh-bye Windows 7!
Philips radio as showed in the ad
During this time, I had learned about the fault in my first slipstreamed XP CD and re-did it. Only this time, I instead of only adding my new RAID drivers I also removed XP’s default RAID drivers – Success! Installation went smooth, XP started as it should and no RAID error messages. For a while. Happy that everything was working as it should, I started to transfer files from the existing computers in the home network to the new computer (as this should now serve as file server). Copying some data, moving some. Stupid, stupid Frank. After a few hours, I rebooted the computer for some reason and noticed that the RAID controller during POST blinked red, stating that the array was degraded! I removed and re-added the drives from the array, but for some reason it refused to be rebuilt. What was worse, Windows now refused to start, giving bluescreens and rebooted every single time. I disconnected the drives from the motherboard computer and hooked them up to my other computer. During bootup, Windows wanted to check for consistency on the drives. Fine, I thought. Perhaps this will solve the problem. I went away from the computer and came back a while later, still doing the consistency check. Only the screen said “Deleting index $blablabla from blablabla” or something like that. I got some bad vibes but didn’t want to turn off the computer in the middle of that process. Windows then started, and the drives were almost empty.
Personal data I always keep backed up, so no worries there. What was really sour was that I lost about 250GB of movies and shows that I hadn’t watched yet. Many of them really hard to get, like Green Hornet (a TV show from 1966 starring among others Bruce Lee) or HD versions of various good movies. Plus all programs, games and other goodies. Well, what are you going to do – it’s not going to do anything good moping.
The real problem
After much searching and many, many forum threads later, I learned about TLER.
Apparently, it is quite common that a disk gets a read or write error under disk operations. When this happens on a normal desktop disk, the drive will enter a recovery cycle, attempting to repair, recover and reallocate the data. This cycle can take anywhere from less than a second to up to a couple of minutes. Since RAID controllers are designed to handle these errors by themselves, RAID-specific disks (often costing twice as much) have a feature called TLER, or Time Limited Error Recovery (name may vary with vendor), which prevents the hard drive from entering into a recovery cycle longer than 7 seconds. Without this feature, both the hard disk itself and the RAID controller will try to fix the problem at the same time.
Most RAID controllers will deactivate a disk in an array if it doesn’t respond in 8 to 15 seconds. Since my drives didn’t have TLER enabled, whenever they encountered a problem taking more time to fix than allowed by the controller, it would get thrown out of the RAID array. The remaining disk would keep on working as usual, and I would not be aware of the problem until the disks were completely unsynchronized. When rebuilding the RAID array without being able to synchronize, errors would occur and Windows would not boot.
The solution
Luckily, there is a small tool from Western Digital [Google] that enables you to turn on TLER their disks that normally has this disabled. I used the tool, and presto – no more problems! Too bad I didn’t know that before losing all that data and having to reinstall Windows yet another time.
Next
I will hopefully get my radio some time this week so that I can put everything in it (right now the motherboard is mounted on a piece of plexi glass with distances in between. I would like to cut a slot in the top of the radio for feeding discs to the DVD reader, but I am a bit afraid of cutting in bakelite. Anyone have any experience? I don’t want to ruin it completely so I might be mounting the DVD drive under the radio instead, adding bigger rubber feet to it if needed.